Saturday, July 27, 2013

Unexpectedly Classy Flower Art

Hey! So I've been wanting to do this DIY for quite a while now. I come across it a lot when roaming about Pinterest and it is just really pretty. As I was doing it I realized it is also a very personal DIY. There are a lot of choices you choose yourself for this, making it your own. I encourage you to improvise when trying this project out!

For this DIY you will need: 
  • Toilet paper or paper towel rolls. The amount you need is different depending on your design.
  • Scissors.
  • Hot Glue Gun and glue sticks for it.
  • OPTIONAL ITEMS: Paint, glitter, jewels, ribbon, etc.
1.Gather your rolls. If there are little pieces of paper on them, just rub them off with your fingers.
2. Flatten your rolls. Just press them down so the opening is a petal shape.
3. If you are using toilet paper rolls, I would say to cut them into thirds. I like the shape and size of these petals. Paper towel rolls are obviously larger so you could cut those into seven or eight pieces. 
My final ended up being a bit different than this but that
always happens;)
4. Once you have a lot of petals, plan your design. It can be a vine of flowers or one large flower. Whatever you want!
 OPTIONAL: If you want to paint your petals, now is the time. If you are going to use a spray paint, you can wait until the end after you have glued your design together. I thought if I waited until after I glued it, it would be harder to get all the cracks and inner parts painted. Add whatever you want to dress up your flowers! Ribbon would be nice so would beads.
I found making two halves then gluing that together made a
prettier flower than going petal by petal.
If you have these annoying flaps
hanging out just glue them down
with some hot glue.
6. Warm up your glue guns people! Glue together your design. Most designs I have seen start with a four petal flower. I did most of my design with that. 
7. Let the glue dry and completely set.
8. If you painted your petals, you can go back and paint over the glue to blend it in and clean up your project.

There you go! These are so pretty and a lot of fun. Place this on any blank wall and it will really get some attention. These three pictures are my finished product and I love it. My flowers are a deep blue and my "leaves" are black with glitter on the thin tops.


Inspiration for mine


*Disclaimer* Everything used in this DIY was purchased by me and all opinions are my own. I have no sponsors.
*Inspiration* LaurDIY's DIY Apartment Decor: Wall Art video. http://www.youtube.com/watch?v=va0sOYEHRho
Just a little inspiration for you:)

Sunday, July 21, 2013

Floral Headbands

So I am kinda late on this trend. Floral headbands have been really popular this summer and I just made my first one. These are so cute and a simple DIY project even for beginners!

For this DIY you will need:

  • 3/4 inch elastic. If you have light hair, use white or cream. If you have darker hair, use black or brown.
  • Fake flowers. I used paper flowers but you can use fake flowers that you would use for bouquets or centerpieces once you remove the stems from them. For a more dramatic look, use large flowers.
  • If you use paper flowers, they could be missing centers so I put Brads in the center. You could also use Beads.
  • Scissors
  • Hot glue gun
  1. To start, wrap your elastic around your head where you would wear your headband. Cut exactly where it wraps around your head.


                                                                     2. Lay your elastic flat on a table. Create a pattern of flowers or           randomly lay them down. See how many flowers fit on your elastic. If you need to, now would be the time to glue beads or brads onto your flowers for the centers.


3. Use your hot glue gun to attach the two ends of the elastic together so they overlap a little. This will make sure the headband is slightly snug on your head and won't slip off but isn't tight because that isn't really the style.
 
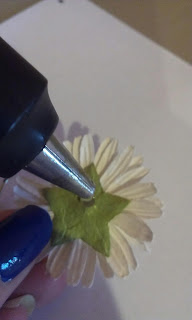
4. Start gluing your flowers onto your headband. Use a bigger flower to cover the seam where the ends met. Just apply the hot glue to the center on the back of the flower then press the flower onto the elastic.

 5. Once you have glued all your flowers onto your headband make sure your glue is cooled.


Done! How easy! This is so cute for spring and summer but you can also take this fashion into the autumn by using some red, yellow, and orange flowers or leaves. I like to wear mine hippy style with curly hair :) Hope you guys loved this DIY!


 *Disclaimer* Everything used, I purchased. No one is sponsoring me. All opinions are mine.

Monday, July 15, 2013

Comical Sunglasses

So this DIY is really simple and I finished it in about 2 hours. I was kinda bored and I just thought it up.

For this DIY you will need: Sunglasses, masking tape, glue (I highly recommend liquid glue but if you don't have that, a glue stick will work), Sunday comics from your newspaper, scissors, and Modge Podge.

   1.Get your sunglasses. I just used a really cheap pair from the Dollar Store. Cover the lens, both inside and out, with some blue tape or masking tape.


   2. Start cutting out some comics. I used Sunday comics because I like the colorful aspect but you could also just do plain old newspaper for the black and white look. You probably won't be able to fit full comic strips or characters onto your glasses so just cut out some colorful parts and faces of your favorite characters.
 

3. Glue your pieces of newspaper on your sunglasses. I glued and cut pieces out as I went so I could see what sizes of paper I needed to fit the on glasses. The sides will be easier to do than the front just because they are wider and will fit more comics. For the front of your glasses, try to get some colorful pieces because there is no way a whole person is gonna fit! I did not glue pieces on the inside of my glasses because I thought it would bother me when I was wearing them.


4. Once you have your sunglasses completely covered, let the glue dry.
   5. Once the glue is dry, cover all of your comics with some Modge Podge. This will keep them on the glasses better. I used a glossy kind but I think a matte finish would make the newspaper effect. Let the Modge Podge dry completely.


 6. Remove the tape from the lenses and...

Ta da! You have a new pair of sunglasses that are one of a kind!
*Disclaimer* I bought everything myself and no one is sponsoring me. These are my own ideas.


From Blue to New: Ombre Shorts

This DIY is one of my favorites. It allows you to take some old and out-of-style shorts and transform them into a new pair that are totally stylish! These ombre shorts are fun to do and a project that is super useful!

-For this DIY you will need: Bleach, water, a bucket, gloves, dye of your choice (whether is be RIT, liquid, powder; whatever you prefer), and an optional item is some studs.

   1. Get a pair of shorts or jeans you turned into shorts. If your shorts have a tag on the back with the brand, that probably needs to be removed. It doesn't work well with the bleach and may not dye the color you want. If you have white shorts, you can skip steps 2-5.
   2. Fill your bucket with a mixture of two parts water to one part bleach (ex. Two cups of water to one cup of bleach.) I recommend warm water from the sink.
   3. With your gloves on, submerge your shorts into the solution. Make sure every part of the shorts are soaked. Squish the shorts around a bit then leave them in the mixture for an hour or so.
   4. Take the shorts out and wring the bleach and water out. Lay the shorts onto a table or cement to dry. Once the shorts are almost dry and have change colors significantly, repeat step 3. Continue repeating steps 3 and 4 until your shorts are white or a very light blue.
   5. Rinse the shorts with cool water and them wash and dry them normally in the washing machine and dryer. Don't go straight to the dryer without washing the shorts; that could ruin your dryer.
   6. Now here's the fun part! Fill a bucket with enough hot water to fully submerge your shorts. Don't have too much water or the dye won't be as bright and bold. However, if you want a pastel color, you can use more water and dilute the dye down. Put in a little bit of your dye, just enough to give your shorts a light tint of the color you are dying them, then stir it up.
   7. With your gloves on, dip all of your shorts into the dye. Get your shorts completely soaked then wring them out and lay them off to the side.
   8. Now add a little more dye, enough to see a difference from your first color but not too much that you don't get the ombre effect. Stir that in then take your shorts by the end, fold the legs together, and dip almost all of the shorts in but leave about an inch or two out of the dye. Make sure you are dying a nice even line and one leg isn't getting more dye than the other. When you wring the shorts out, make sure the waist line is at the bottom so you don't get the bottom a dark color. Also keep in mind that after you wash and rinse your shorts, they will be a lighter color so you will want the shorts to be darker than how you really want them.
   9. Continue to add more and more dye to the water gradually and then gradually dip less and less of your shorts in. For a much more precise ombre, add the dye in very gradually and in small incriminates and make the space in between different shades of your colors smaller. Don't add too much dye at a time or the shorts's color will look blocky.
   10. Once you have dipped all the way up to the waist, lay the shorts out to dry. Let them dry then rinse with cold water. Make sure you still have the waist at the bottom because the dye can still bleed into the light areas. When the water runs clean and clear, rinse the shorts with warm water.
   11. Wash and dry the shorts normally. They will be lighter than before so don't freak out.
   12. An optional step is to stud your shorts to your pleasing. To stud, just poke your studs through the denim and bend the ends down so they don't poke you and they stay on your shorts. I bend mine down with tweezers.
And now you are done! I love my shorts and I always get compliments every time I wear them. If you have questions feel free to ask! See you next time!
*Inspiration* Dani Noe's SIY: Ombre Dip Dye Studded Shorts video.
*Disclaimer* Everything I used I bought and nobody is sponsoring me.